Tutorial # 4
Notes 101 : To be able to do this tutorial you'll really need to be comfortable using PSP 7, and it's tool bars.
We will be using this sample image for this tutorial. Download it by right clickig and selecting "Save Picture As". 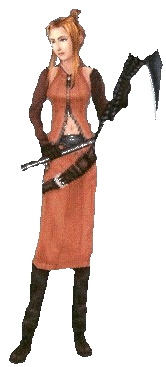
Before Hand : HTML - To learn the basics and the fun of HTML visit Lissaexplains.com,
and familiar with PSP tools and what their purpose is.
Step 1: Open Sample Image
Select New, and under image characteristics select 'Background Color::Background Color'. Then in the color table set your foreground to white. Open the sample image.
Step 2: Drawing the Layout
Using the preset shape tool, set to rounded rectangle, line width=5,
Antialias=unchecked. Draw a rounded rectangle on the blank image, making sure you make it close to the edges, but not going over the edges.
Use magic wand (the black chalk thing with white tips), click on the background of the sample image. File ->
Selection ->Invert Selection.
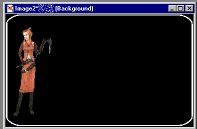
Press ctrl-c on keyboard (that means you've just copied the image on to the clipboard). Return to the image with the white rounded rectangle, press ctrl-e (or Edit -> Paste -> As new Selection) to paste the sample image. With the
selection still active, use your mouse to move the image to the left side of the image, as shown in the image below.
To deactivate the feathers, right click the image after you're done moving it. If you mess up simple hit ctrl-z to move it again.
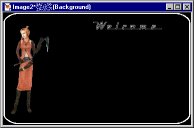
Using the text tool, select a text. I'm using 'Raceway'. Either type in 'Welcome' or use your title...
Note : The example image isn't shown to scale, so make the text at least 28pt.
Step 3: Slicing Layout - The Fun, but difficult part...
Layouts have to be sliced properly, or they won't function properly. First see how many colors you layout has, and this one has 446, or just about 500. So you can save it as a GIF. Decrease it by selecting Colors -> Decrese Color Depth -> 256 Colors -> Optimized Median Cut -> Error Diffusion. Then select File -> Save As -> Compuserve (*gif) -> Options -> Run Optimizer -> Transperancy None -> Color 100 of 256 -> dithering none -> Optimized Median Cut -> Format -> Non-Interaced -> Version 89a -> OK.
Open Paint Shop Pro slicer tool, by selecting File -> Export -> Image Slcier.
Zoom the image out to 1:3. Selcet the Grid tool, and click the image. Set it to Rows -> 2 & Columns -> 2. Then select the arrow, and move the lines around until you get something like this, by adding one horiztontal line, and one vertical line in the right corner bottom box with the 'knife'.
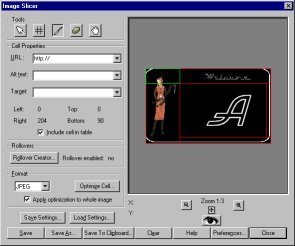
Optimize Cell GIF, setting the code as the same as we saved the picture before. Paint Shop Pro slicer will slice the
image and generate the HTML code for you.
You should get 6 images excluding the original layout image
+ 1 HTML file.
Step 5: HTML and modification
Open the html file in an editor or Notepad. ^^
Add in the code (<BODY BGCOLOR="#000000" TEXT="#FFFFFF" LINK="#FFFFFF" VLINK="#FFFFFF">) after the closed HEAD tag.
This will show that the background will be black and the links will be white. Then you can center the
layout by adding <center></center> at the
beginning and end of the code. (In other words before 'Begin Table' and before 'End Table'.) Don't forget to type your title in the Title heads.
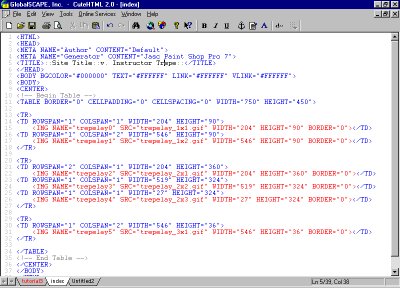
The fun part begins! ^^
- Delete trepelay_2x2.gif image. If you named your base name trepelay, the image
will be trepelay_2x2.gif. Take note of the width of the image. Mine was 519
pixels. (Notes 101::The width probably won't be the same as mine.).
- DELETE ONLY <IMG NAME="trepelay3" SRC="trepelay_2x2.gif" WIDTH="519" HEIGHT="324" BORDER="0"> for that cell where your delete
the trepelay_2x2 image.
You can put in contents in the "<TD ROWSPAN="1" COLSPAN="1" WIDTH="519" HEIGHT="324">here</td>" cell. This is Area A on the sample above.
You will need to put all your contents and naviagtion here.
That wasn't all that tough was it?
Tips
Always check the color count to see if you can decrease it for faster loading. ^^ Since that's always a good thing.

 Web Graphics Menu